What is Defects in Clothing?
A defect is an unwanted feature in a product or absence of a desired feature or a feature existing in distorted or wrong way. In the apparel industry defects is the common word during apparel manufacturing. Various types of defects are occurring in the garment production time. Quality inspector always tries to follow about garment defects, because any single defects may be completely destroying company profit and reputation also.
Types of Clothing Defects:
There are 2 main types of defects in clothing. Such as:
- Sewing defects
- Non-sewing defects
In the clothing industry during sewing, frequently occur different types of sewing defects. Sewing defect that occur may be categorized in the following way:
- Defects due to problem of stitch formation
- Defects due to fabric distortion or puckering
- Defects due to fabric damage along stitch line
Stitch formation defects are some of the most common issues in garment manufacturing. They directly affect seam strength, appearance, and overall garment quality. In this article I will discuss various Stitch formation defects with causes and remedies / solutions.
Stitch Formation Defects in Apparel Industry with Causes and Remedies
These are the defects that occur due to problems related with stitch formation in garments industry. Such rejects may be enumerated below with causes and remedy.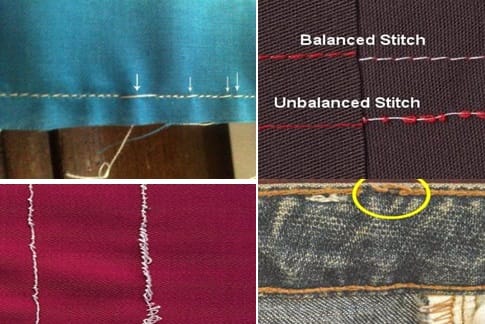
Defects caused by stitch formation problems are among the most common quality issues in the apparel industry. Stitch formation depends on the smooth interaction of the needle, thread, fabric, and sewing machine settings. Any irregularity in these factors can lead to visible and structural defects in garments.
Here’s the detailed about defects due to problem of stitch formation with their causes and prevention in below:
1. Skipped Stitches:
They occur when the bobbin hook or looper of the machine cannot pick up the loop in the needle thread. Slipped stitch with a lock stitch machine leads to creating a gap in a seam and a poor appearance in top stitching.
Causes:
- Unsuitable thread
- Defected needle
- Wrong needle size
- If needle thread loop size is too small
- Poor feed of fabric
Prevention:
- Use right thread
- Replace defected needle
- Use right needle
- Needle size and thread size must be adjusted
- Control thread tension
- Use right feed mechanism
2. Thread Slippage / Unraveling:
Stitches come undone after sewing.
Causes:
- Improper back tacking
- Loose thread tension
- Slippery fabric or thread
Prevention:
- Ensure proper backtacking
- Maintain adequate tension
- Use textured or lubricated thread if needed
3. Loop Formation / Loose Stitches:
Loops appear on the top or bottom of the seam.
Causes:
- Incorrect upper or lower thread tension
- Improper threading
- Timing issues between needle and hook
Prevention:
- Re-thread machine correctly
- Adjust thread tensions
- Check and correct hook/needle timing
4. Uneven / Irregular Stitches:
Stitch length varies; seam looks uneven or wavy.
Causes:
- Uneven feeding of fabric
- Improper tension setting
- Operator handling inconsistency
- Worn feed dog or presser foot
Prevention:
- Adjust presser foot pressure
- Maintain uniform feeding
- Train operators on proper fabric handling
- Replace worn machine parts
5. Staggered stitch:
It is caused by the yarns in the fabric deflecting the needle away from a straight line on a hard, thick woven fabric.
Causes:
- Comparatively thin needle
- Blunt needle
- Needle size and thread size not matching
- Defected motion of feed mechanism
- If fabrics are not controlled properly in the feed mechanism
Prevention:
- Use bias sewing
- Use right needle
- Change blunt needle
- Motion of feed dog to be adjusted
- The pressure of pressure foot must be adjusted accurately. Feed mechanism to be changed.
6. Unbalance stitch:
Thread tensions generally cause unbalanced stitches and give poor appearance.
Causes:
- Thread tension
- Thread passes through wrong path
- Bobbin case and positioning finger snagging
- If the threads are not lubricated
Solutions:
- Control thread tension
- Control thread twisting
- Make bobbin case smooth and reset positioning finger
- Better qualities of Lubricate threads must be used
7. Variable stitch:
It occurs, especially, with sticky or slippery materials and also when material feeding is uneven.
Causes:
- Sticky slippery fabric
- Wrong feed mechanism
- Use of low quality thread
- Twisting of needle thread in the bottom of thread package
- Twisting of thread in the thread guide
- More tension to the thread.
- Fraying of thread in the needle.
- Becoming more heated of thread and hook.
Prevention:
- Use right feed mechanism
- Adjust feed mechanism with fabric
- Thread to be changed.
- Foam pad must be used to the bottom of thread package.
- Proper threading of sewing thread during sewing.
- The tension of thread should be less or use of higher strength threads.
- Finer threads must be used or to be used heavy needle.
- For thread, high quality needle, needle lubrication, and needle cooler must be used. For hook, examine the distance between needle and hook, lubricant must be available.
8. Thread breakage:
Needle and bobbin or looper threads break mainly due to metal surfaces being chipped or otherwise damaged and then causing damage to the thread. The guard over the hook in a plain machine or the needle hole in the throat plate can become chipped as a result of needle deflection. This causes thread breakage. Thread breakage is a time-consuming problem arresting productivity.
Causes:
- If the metal surface of hook point, bobbin case, needle guard, needle groove and needle hole in throat plate etc with sharp.
- If thread fails to unwrap from thread package
- If obstructed in the thread guide;
- Snarling before tension disk.
- Wrong fitting of bobbin case.
Prevention:
- Changed the hook point, bobbin case, needle guard, needle groove and needle hole in throat plate etc with sharp hole and to be smooth.
- Set thread guide above thread package having a distance 2.5
- Re-set tension disk.
- Examine the size, type of bobbin, damaging of bobbin case.
9. Bird Nesting (Thread Tangling):
Tangled thread collects under fabric at seam start.
Causes:
- Incorrect threading
- Loose top tension
- Improper bobbin winding
- Needle not correctly inserted
Prevention:
- Correctly thread upper and lower paths
- Adjust upper tension
- Ensure proper bobbin winding
- Check needle insertion
10. Broken or Popped Stitches after Washing:
Stitches break or open after washing or stretching.
Causes:
- Incorrect thread type
- Tight stitches
- Incompatible thread elasticity
Prevention:
- Use core-spun or stretchable threads for knits
- Reduce tension and stitch density
- Match thread elasticity to fabric type
Remedies focus on balancing thread tensions, selecting correct machine settings and materials, controlling fabric behavior during sewing, and ensuring accurate machine feeding and threading processes to avoid stitch formation defects that impact garment quality.
This detailed understanding aids apparel manufacturers in minimizing defects from stitch formation, improving garment durability, appearance, and customer satisfaction.

Editor of Fashion2Apparel. She is a fashion designer and ex-lecturer in Fashion Designing. She wants to spread fashion knowledge throughout the world.