What is Patch Pocket?
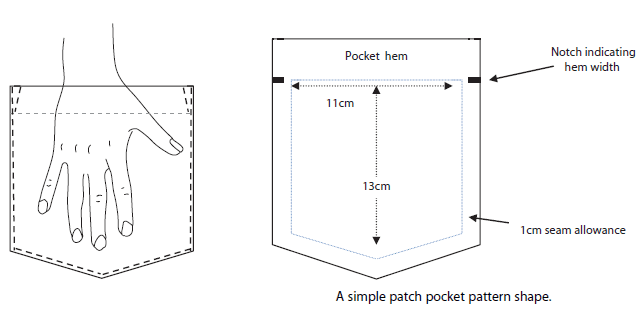
A patch pocket is one of the simplest pockets to construct. The size of the pocket should accommodate the hand. Decide on the pocket length and width by measuring the hand size. The patch pocket may be furnished with a flap that holds it shut. The patch pocket is used on tailored jackets when a more casual effect is desired. The patch pockets can be cut in the desired shape and are fastened to the outside of the garment.
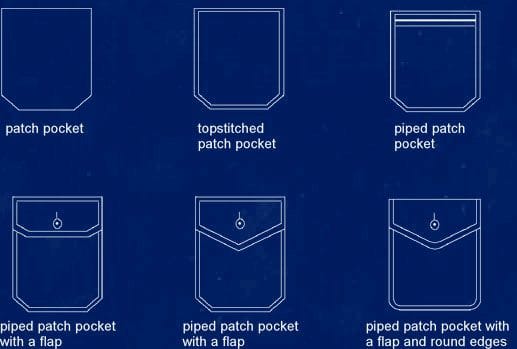
Patch pocket are attached to the outside of a garment. This type of pocket can be designed in a number of sizes and shapes, with or without a flap.
Construction of Patch Pocket:
Construction of patch pockets contains three layers: the first layer is the pocket itself; a middle layer is an interfacing; and the third layer is a lining matching with the garment lining.
Pocket cutting and marking:
The steps involved in the attachment of a patch pocket with a separate lining and interfacing is given in detail below:
- A muslin fabric is patterned according to the size and shape of the finished pocket without including seam or hem allowances.
- All the seams in the garment under the patch pocket should be completed and the location of the pocket on the garment panel should be thread-traced.
- With the front side of the garment panel facing up, the pocket pattern is positioned over the thread tracing that marks the pocket’s location. The continuation of the grain or the colour bars of the fabric pattern are drawn onto the muslin pocket. The pattern at the edge of the pocket patch, towards center front is matched with the garment. This process can be made simple by pinning a fabric scrap on it to use as a guide when cutting.
- Right side facing up, the muslin pocket pattern is laced on a large scrap of the garment fabric. The design and grain on the pattern should be matched with those on the fabric scrap. After proper matching, a chalk-mark is made around the pattern, followed by thread tracing.
- Finally, the pocket is cut out along with the seam and hem allowances.
Interfacing the pocket:
The interfacing assists in retaining the shape of the pocket and the interfacing material for a pocket should be crisper. The weight and drape of the base fabric should be considered while selecting the interfacing material. Commonly used interfacing materials are muslin, linen, hair canvas and crisp lining fabrics. The interfacing can be cut on the length grain, cross grain or on the bias depending on the requirement. Cutting the interfacing along the cross grain will have minimum stretch in the opening of the pocket and eliminates the need for stabilizing the pocket opening. An interfacing cut along the bias will have more flexibility and shapes better to the body. Generally, the size of the pocket decides the size of an interfacing. Fusible interfacings can be cut to the size of the finished pocket or can be extended up to the seam allowance.
When the interfacing extends into the seam or hem allowances, the pocket edges will be slightly rounded instead of sharply creased.
- The pocket should be kept with the bottom side up so that the interfacing can be placed over the pocket such that the top of the interfacing material matches with the bottom of the pocket seam line. The centers are basted together using large diagonal basting stitches.
- The pocket hem and seam allowances are folded and pinned to the edges of the interfacing. During this, it must be ensured that threadtracings fall along the extreme edges of the pocket and are invisible from the right side of the pocket. If not, the pins are removed and the interfacing edges are trimmed very slightly. It is repined and checked again.
- The pins are released and the pocket is made flat. Now the pocket is topstitched. Prior to topstitching, a guide is thread traced at the desired distance from the finished pocket edges. Usually, a soft basting thread that breaks easily is used for this purpose. The basting thread can be removed and stitching can be carried out.
- Catch stitches should be used to sew the edges of the interfacing to the pocket in the wrong side. This step can be skipped if the pocket is topstitched.
- The opening of the pocket could be stabilized with a silk organza fabric with seam binding. Then the pocket is steam-pressed.
Finishing of pocket edges:
For pockets with curved edges, the seam allowance is ease-basted twice at the curves, generally about ⅛″ from the interfacing and again ¼″ away. The ease basting is pulled up to make the seam allowance fit elegantly against the pocket, and the excess fullness is shrinked out. A piece of brown paper can be inserted between the seam allowance and the interfacing as a precautionary step to avoid shrinking of the pocket.
- For square cornered pockets, the seam allowance at the bottom is folded underneath. Basting is done at ¼″ from the seam line and the pocket is pressed. Likewise, the side seam allowances are folded and basted.
- After folding the bottom and side seam allowances, the excess bulk at the corners are trimmed and the edges are pressed again. The corners of bulky fabrics must be spanked with a clapper to flatten them.
- The top hem should be folded to the back side and all the edges of the pocket are basted at about ¼″ from the edges.
- With the back side of the pocket up, the seam allowances are trimmed close to the basting to reduce the bulk. Again, the edges are pressed to shrink out any excess fullness.
- The right side is flipped up, the pocket is positioned on a tailor’s ham or pressing pad that simulates the body’s curve in the pocket area. The pocket is covered with a press cloth, and shaped to the natural curve of the body.
- When making a pair of pockets, both pockets must be identical.
While making asymmetrical garments, where one half of the hip is larger than the other, the pocket for the larger side can be made slightly larger (up to ¼″), but when worn, the changes in the two pockets should be imperceptible.
Lining of pocket:
This lining technique with the wrong sides together is applicable for flaps, facings and waistbands.
- A lining fabric is cut in the form of a rectangle on the same grain as the pocket and at least ¼″ larger than the pocket on all sides.
- A fold of 1″ is made at the top of the lining and it is pressed.
- With the back sides facing each other, the lining material is kept over the pocket with the folded edge lying ¾″ below the pocket top. The pocket and the lining are basted together with diagonal basting stitches after matching the centres.
- The remaining raw edges of the lining are folded underneath at about ⅛″ to ¼″ from the edges. The lining is trimmed to remove excess bulk. The lining is pinned and then basted to the pocket. The edges are pressed slightly.
- The lining is fell stitched in the appropriate place. All bastings are removed and the completed pocket which is ready to be attached to the garment is pressed thoroughly using a damp press cloth.
- This is the last instance where the pocket can be topstitched.
Set the pocket:
The garment may be stabilized with interfacing under the pocket or just under the opening prior to the setting of the pocket. If the pocket serves a decorative purpose or if the entire front is backed with interfacing, an interfacing is not required. But if the pocket is designed for occasional use and the front is not entirely interfaced, staying the opening becomes essential.
- An interfacing stay of 2″ width is cut on the lengthwise grain such that it is long enough to be sewn to the interfacing at the front opening and to a dart or seam at the side.
- Wrong side facing up, the stay is basted over the thread-traced pocket opening. While sewing the pocket, the stay should also be sewed to secure it.
- The face side of the pocket should be turned up and the edges of the pocket are aligned on the garment. A large ‘X’ is basted at the center of the pocket following which basting is done at about ¼″ from the edges using uneven basting stitches.
- The fit of the pocket is examined. The pocket should fit smoothly or stand away from the garment slightly but it should not be tight. Rebasting is done if the pocket is too tight.
- The garment is turned over to the wrong side and the pocket is permanently secured using short running stitches or diagonal stitches. The basting acts as a guide to sew ⅛″ away from the pocket edges. The stitching should be done in such a way that the stitches do not show up on the pocket face. For regular use pockets, two rows of stitching are done around the pocket.
- At the upper portion of the pocket, with the back side up, numerous cross stitches should be sewn at each side of the pocket for better reinforcement.
- The last step includes removal of the bastings and pressing of the attached pocket with a press cloth.
A Project for Making a Patch Pocket:
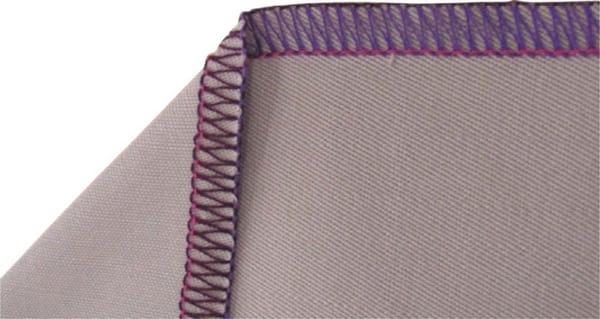
- Use the Three Thread Overedge stitch (504) to neaten the top edge of the pocket.

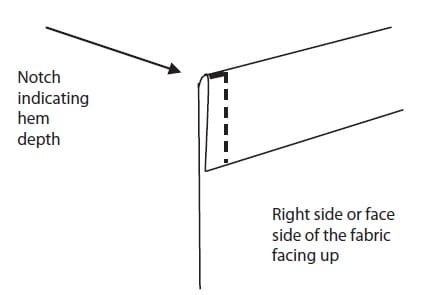
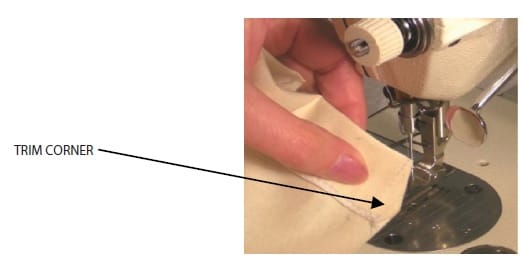
- Fold over the hem of the pocket at the notches and use the Lockstitch (301) to sew (bag out) each corner by stitching 1cm from the edge.
- Trim surplus fabric from each pocket corner (see Figure 8).
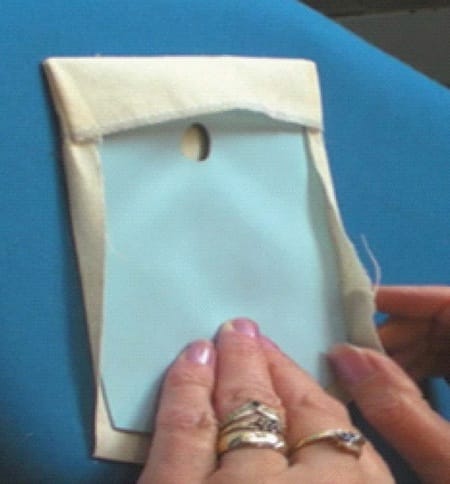
- Fold the pocket hem and, using an iron, fold the remaining raw edges around the template (see Figure 9).
- Using the Lockstitch (301), secure the hem in position by sewing on top of the Overedge stitch.
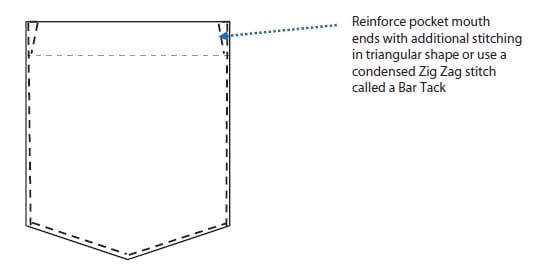
- The pocket is now ready to attach to the garment. Using a Lockstitch (301), stitch the pocket onto the garment. The stitching line should be located 2mm from the folded fabric edge. Reinforce the weak points at each side of the pocket mouth.
References:
- Apparel Manufacturing Technology by T. Karthik, P. Ganesan, and D. Gopalakrishnan
- Guide to Basic Garment Assembly for the Fashion Industry by Jayne Smith
- Classic Tailoring Techniques: A Construction Guide for Women’s Wear by Patricia Flaherty Meyers and Roberto Cabrera
- Patternmaking for Fashion Design by Helen Joseph Armstrong

Editor of Fashion2Apparel. She is a fashion designer and ex-lecturer in Fashion Designing. She wants to spread fashion knowledge throughout the world.