Last Updated on March 5, 2022
What is Seam Allowance?
The distance between the stitching and the raw fabric edge depends on the type of seam and the need for adjustment.
Seam allowance is the margin of fabric added to pattern seam lines so that the pieces can be sewn together and pressed open. Turn a finished garment inside out to see all of the seam allowances.
Seam allowance enables you to sew the garment pieces together and to attach other garment parts, such as closures, trimmings, facings and collars. The allowance can vary from 0.5 to 3.5cm (3⁄16–15⁄16 inch) depending on the material structure, fabric weight, the intended seam finish and garment design.
Seam allowances affect the way the seam and the entire garment hang. Smaller seam allowances are easier to handle as they are less bulky and the sewing result will be more accurate than with a large seam allowance.
Objectives of Seam Allowance:
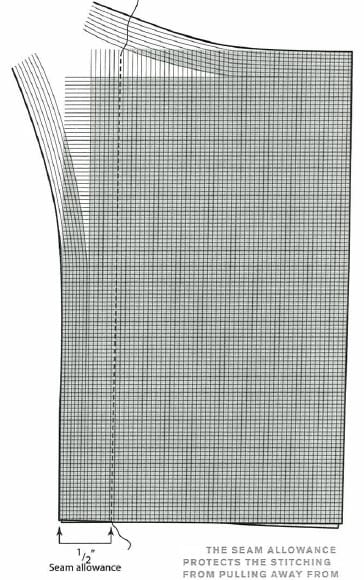
- Seam allowance to protect the stitches from pulling away from the seam.
- Seam allowance allows the garment to befitted.
- Seam allowances are added to the sewing edge and preferably included on a pattern piece before the pattern is cut out.
- Seam allowance can be stitched wider if the garment is too big, or let out if too tight.
- Seam allowance can be added in inches (imperial measurements) or in centimeters (metric measurements).
When Do You Use It?
For every seam you sew, you must include a seam allowance. (The exception is abutted seams) On most sewing patterns, the standard seam allowance is 5⁄8″ (1.5cm.) Seam allowances are marked on the pattern pieces or listed in the instruction sheet. Make sure you know what the seam allowance is before you start sewing.
Some patterns are sold without any seam allowance added, so you will have to add it as you cut out the pieces. This is convenient if you want to change the seam allowance, but it’s an additional step to do before you can start sewing.
Tips and Techniques of Seam Allowances:
Some tips and techniques are mentioned in below. These are helps to make defect free and fit garments.
Techniques of seam allowances:
| Type of seam or fabric | Seam allowance | Finishing |
| Most garment seams | 1cm (3⁄8in) | This is the most widely used seam allowance in the industry. |
| Shaped seams | 0.5cm (3⁄16in) | Such seams include necklines and enclosed seams, such as facings or collar pieces. This is to avoid having to clip or trim the seam. Also used for less stressed seams. |
| 1.5–2cm (9⁄16–3⁄4in) | A wider seam allowance not only allows for fraying but will ensure a heavyweight fabric lies flat after pressing. |
| Toiles – first fitting | 2–2.5cm (3⁄4–15⁄16in) | A wider seam can be let out if necessary for the second fitting. |
| Centre back and crotch seam of trousers, especially for men’s tailoring | 2.5–3.5cm (15⁄16–15⁄16in) | A wide seam offers more support and can be let out over time if necessary. You can also use a wider side seam to prolong the life of a garment. |
| Bias binding or a raw-edged finish | No allowance needed | |
| Specific seam finishes | French seam: 1cm (3⁄8in) Flat fell seam: 2cm (3⁄4in) | |
| Overlocked seams | 0.5–1cm (3⁄16–3⁄8in) | Do a test sample on the over locker before adding seam allowance. |
Tips of seam allowance:
Make sure seams that will be joined together have the same seam allowance. This will make sewing easier and avoid confusion.
1. For Wide Seam Allowances:
If you have wider seam allowances on your fabric pieces, there is room to let out the seams. When making a muslin (page 118), you might want to cut the muslin pieces with extra-wide seam allowances for fitting. Leaving wider seam allowances on your finished garments gives you the chance to let out the seams later on, if needed. However, they may show through the garment and add bulk. You might want to keep the seam allowances wider than normal in certain areas of a garment, for example, at center back.
2. For Narrow Seam Allowances:
Often sewing patterns for knit fabrics will have ¼” (6mm) seam allowances for sewing with a serger. If you are very short on fabric and know you won’t have to make fitting changes, you could reduce the seam allowances on your fabric pieces. Also, on very tight curves, the seam allowance can be reduced to make it easier to sew. Sometimes strap or loop pieces will have narrow seam allowances since a wider seam allowance would have to be trimmed off. Narrow seam allowances don’t allow any room for alterations later on.
How to Change the Seam Allowances on a Pattern:
Figure 2 out where your seam lines are. If your pattern has 5⁄8″ (1.5cm) seam allowances, the seam line is located 5⁄8″ (1.5cm) in from the cutting line. Draw in the seam lines on the pattern piece.
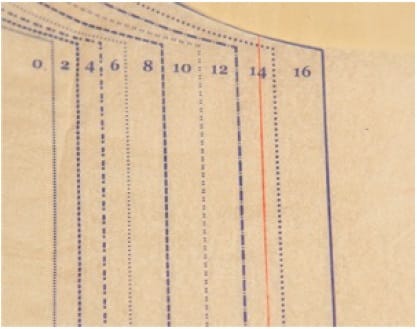
Figure 3 decide what your new seam allowance is going to be. If you are adding to the seam allowance, tape a piece of scrap paper along the seam line for the extension. Or, if you haven’t cut the pattern piece out completely, leave extra tissue paper where you plan to add. Add this amount to the seam line, measuring it off from the seam line at the beginning, end and several points in between.
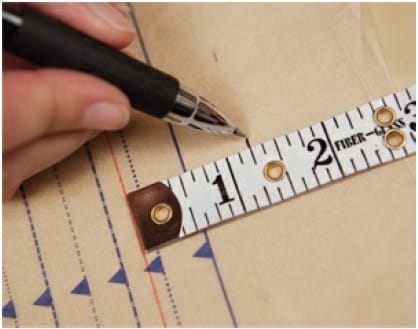
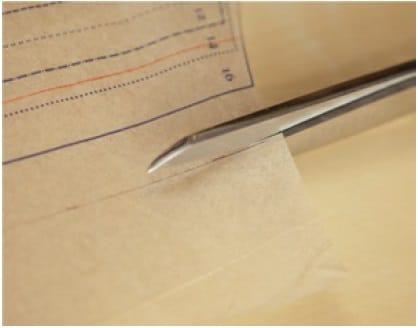
Figure 4 draw in your new cutting line. When you sew this seam, remember to take the new amount of seam allowance instead of the original amount! Make a note of this in the pattern sewing instructions so you don’t forget. Remember to adjust the seam allowances on both sides of the seam.
What is Hem Allowance?
The hem allowance is the width between the hemline and the hem edge. The hem allowance is folded back under the garment to the wrong side of the fabric; the clean finished edge is the finished hemline, the clean finished edge is the finished hemline.
The hemline is the lower edge of a garment and the hem allowance is the width between the hemline and the hem’s edge. The hemline is usually folded under towards the wrong side of the fabric to tidy up the edge. Hem allowance is determined by the garment silhouette, design and fabric weight. The measurement can vary between 0.5 and 5cm (3⁄16 and 2in). As a general rule, the wider and fuller a skirt, the smaller the hem allowances. The hem allowance can be added to a garment or, alternatively, the hemline can be finished with a facing, bias binding or trimming.
A hem allowance is the length included in the pattern for the hem. You must account for this when choosing the length of your garments. The hem allowance is often noted right on the pattern pieces; if not, it will be mentioned in the pattern instructions.
Hem allowances can be very narrow, just a regular seam allowance, or very wide, up to 6″ (15.2cm).
Math for Fashion Designer:

Tips and Techniques of Hem Allowances:
Some tips and techniques are briefly mentioned in below. These are helps to get the clean finished edge on garment.
Techniques of hem allowances:
Sleeve hem allowances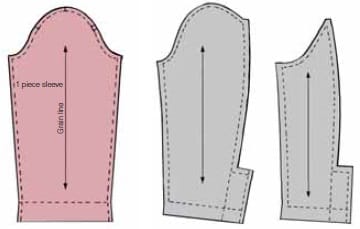
| ||
| Types of sleeves | Hem allowance | Finishing |
| Jacket or coat | 3–5cm (11⁄8–2in) | Add to the hem edge or cut separately as a facing. |
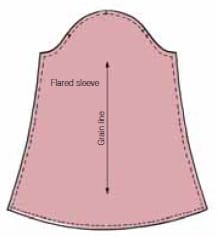
| Flared sleeve to the hemline | Up to 1cm (3⁄8in) or a facing cut in the shape of the hemline | Depends on the design and fabric weight. |
| Jacket and coat hem allowances
| ||
| Jacket and coat | 3–5cm (11⁄8–2in) | In general, be generous with jacket and coat hems. Add to the hem edge or cut as a separate facing. |
| Trouser hem allowances
| ||
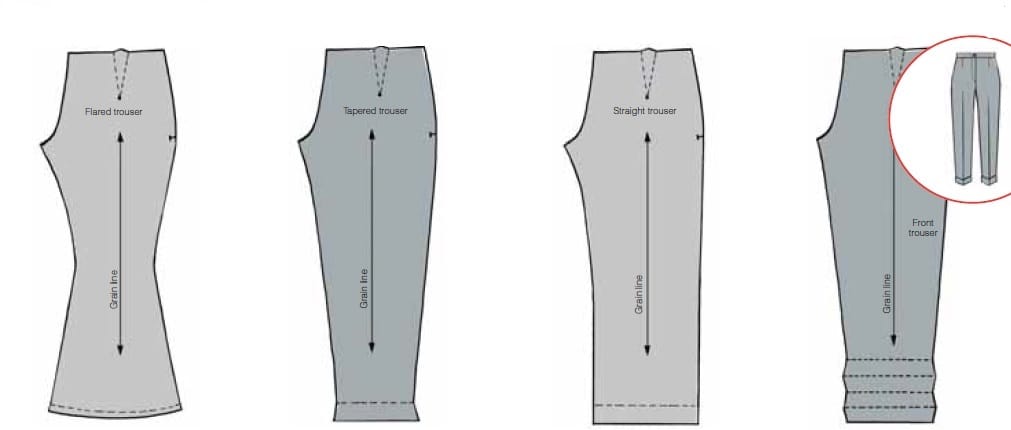
| Type of trouser | Hem allowance | Finishing |
| Flared leg | Up to 1cm (3⁄8in) or a facing cut in the shape of the hemline. | Depends on the design and fabric weight. |
| Tapered leg | 3–5cm (11⁄8–2in) | Once the hem allowance is added, fold it up before cutting the sides off the pattern in order to get the correct angle. |
| Straight leg | 3–5cm (11⁄8–2in) | Fold up the hem allowance and either hand or machine finish. |
| Trouser with cuff or turn-up | Depends on the design. Add twice the depth of the cuff to the hemline plus the hem allowance. | Fold up the allowance into the right position before cutting the sides off the pattern in order to get the correct shape. |
| Skirt hem allowances
| ||
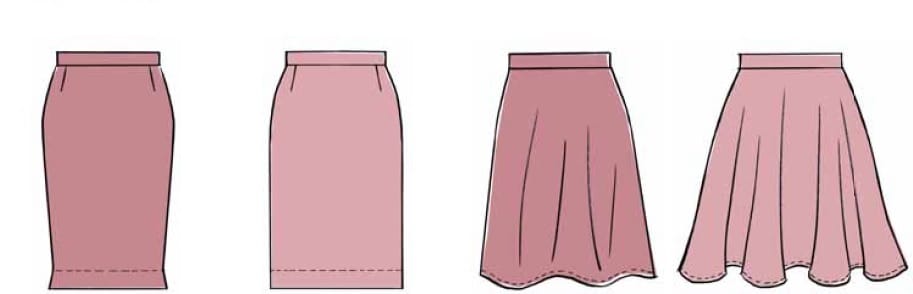
| Type of skirt | Hem allowance | Finishing |
| Pencil skirt | 3–5cm (11⁄8–2in) | Once the hem allowance is added, fold it up before cutting the sides on the pattern in order to get the correct angle for this tapered skirt. |
| Straight skirt | 3–5cm (11⁄8–2in) | Fold up the hem allowance and either hand or machine finish. |
| A-line skirt | 1–3cm (3⁄8–11⁄8in) | When adding this hem allowance, consider the shaped sides of the skirt. An A-line skirt can also be finished with a separate facing cut in the shape of the hemline. |
| Flared skirt and full circle skirt | Up to 1cm (3⁄8in) or a facing cut in the shape of the hemline. | Depends on the weight and type of fabric; a chiffon skirt would be finished with a pin hem, whereas a full circle silk satin duchesse skirt would have a facing as a hem finish. |
| A full-circle skirt is full and flouncy | Reduce the hem width to 1/2 inch | In sheer fabrics a narrow hem will not shadow and will look inconspicuous from the correct side of the fabric |

Tips of hem allowances:
- It’s easier to shorten garments at the hemline than it is to lengthen them! When in doubt, add extra length to the hemline.
- Lining is always hemmed to hang shorter than the main fabric. The general rule is to hem the lining 1″ (2.5cm) shorter.
- When hemming in a circle, for example on a sleeve hem, overlap the stitching by four or five stitches when you reach the start point, instead of backstitching, for a subtle look.
- Hem allowances in knits are reduced to 1 inch regardless of the style.
References:
- Professional Sewing Techniques for Designers by Julie Cole and Sharon Czachor
- The Sewtionary: An A to Z Guide to 101 Sewing Techniques and Definitions by Tasia St. Germaine
- Essential Sewing Reference Tool: All-In-One Visual Guide by Carla Hegeman Crim
- Sewing for Fashion Designers By Anette Fischer
You may also like: Seam Puckering in Garments: Types, Causes and Remedies

Editor of Fashion2Apparel. She is a fashion designer and ex-lecturer in Fashion Designing. She wants to spread fashion knowledge throughout the world.