Last Updated on June 23, 2023
Introduction:
Every man is different from the other man, because their size, posture, figure, and the shape of the body; all are changed on the way a shirt fits. For making bespoke or industrial dress shirts, a perfect measurement guideline must be needed.
For getting an actual measurement and a handsome look of a long sleeve basic shirt, you should know the right measurement procedure. Before taking the step by step measurement you have must know the different parts of a long sleeve shirt, because that is the main part for measurement techniques. But measurement guideline is totally different according to style and fits of the shirt.
When it comes to men’s dress shirt, proper measurements are crucial to ensure a comfortable and well-fitting garment. A well-fitting dress shirt will not only look better but also make you feel more comfortable. Here are some guidelines for measuring yourself to find the right size.
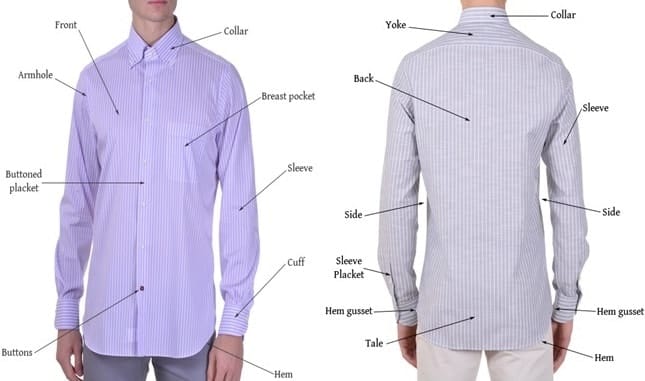
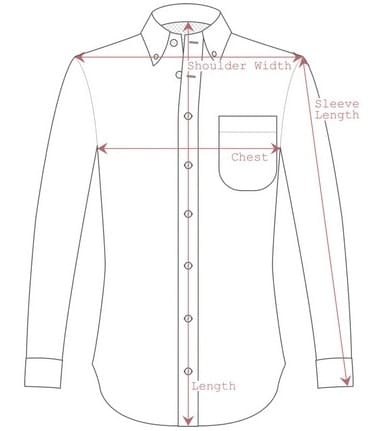
Different Parts or Components of a Men’s Dress Shirt:
Here I will give different components of a dress shirt. All these parts are mention in below with picture.
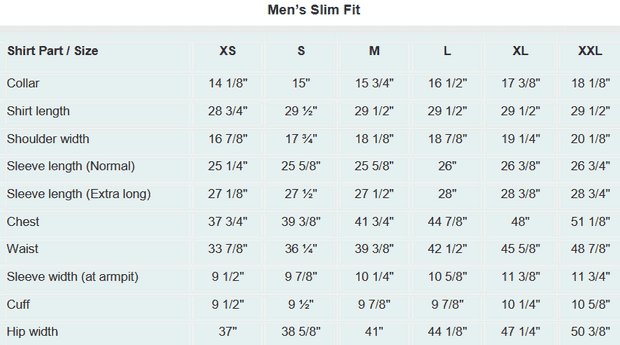
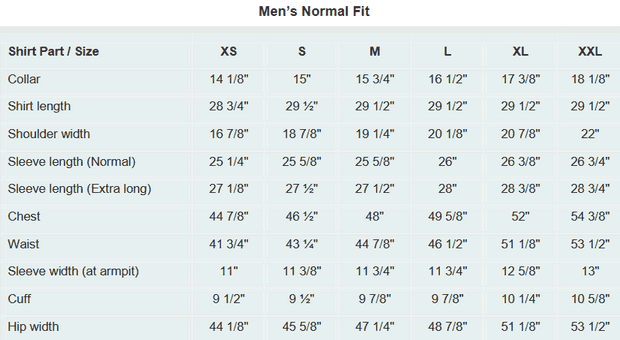
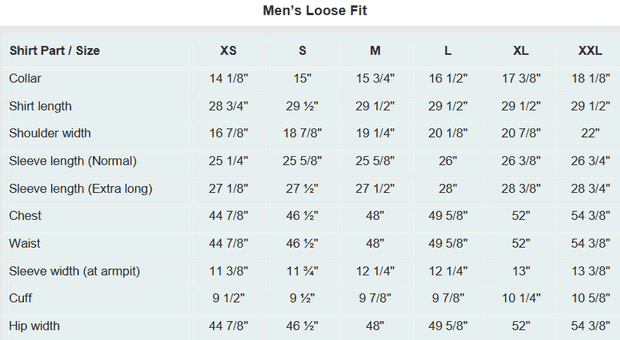
Standard Size Measurements Chart for Men’s Dress Shirt (European sizes):
Necessary Tools for Taking Measurement:
Some proper measurement tools that are must need to complete this task successfully.
- Fabric Measurement tape
- Size chart sheet
- Flat surface or table (If you take measurement from another shirt)
- Full-Length Mirror
- Well fitting shirt, pair of trousers (not jeans)
- Helpful assistant
How to Take Measurements for Men’s Dress Shirt:
Before taking a size measurement of a men’s dress shirt you should choose a comfortable and perfect fits of shirt. And finally follow some tricks for shirt for taking measurement. They are below:
- Avoid the stretch of shirt
- Must be remove the shirt wrinkles
- Fabric covered surfaces is not use.
- Shirt surfaces must be flat on table.
- Stay the measuring tape comfortably not tight.
- Measurements should be take to nearest inch or centimeter
Before taking a step by step measurements process for men’s dress shirt, we are follow two methods, they are
- Measurement method from the best fitting shirt
- Measurement method from the human body or dummy
Now I will discuss how to take you the measurement from a best fitting basic long sleeve shirt.
1. Neck size: Neck size is the gap from the collar button position to the collar hole center position.
2. Band width: Band width is the width of the band center.
3. Collar width: It is the width of the collar at band center of shirt.
4. Collar spread: It is the distance between two collar points.
5. Collar point length: Collar point length is the distance between collar point and the band point.
6. Collar height: It is measure from the height of the center of collar when shirt is folded.
7. Sleeve length: Normally the sleeve length is measured from the top of the shoulder to the end of the cuff. On the other hand it is also can measure below the following ways:
- The sleeve length is measured from the band center bottom to end of cuff;
- It is the distance between top of armhole to end of cuff.
8. Sleeve opening: It is the boundary space between button positions to button hole when cuffs button is fastened.
9. Cuff length: To get cuff length, place the measurement tape on the center of the button hole and measure across to the center of the button.
10. Cuff width: It can be taken from the one end of the cuff to another end. This is the cuff width shown in the figure.
11. ½ Arm hole: Take a front face shirt, place a measurement tape on the top of the armhole seam and run your tape in curve way and continue it where the armhole & bodies are attached.
12. Upper arm or Half Bicep: place your shirt sleeve laid flat. It is the width of sleeve at the upper arm. Generally measurement can be taken about 15cm to 18 cm from the top of the shoulder seam. ½ armhole is at least 6cm bigger than half bicep.
13. Elbow: It is the boundary space of the elbow.
14. Across chest: It is the shortest distance on the chest between two arm holes.
15. ½ Chest: Measure from side seam edge to other edge just 1”- ½” bellow arm hole.
16. ½ Waist: Measure from side seam edge to other edge at the waistline.
17. Hip: Measure from side seam edge to other edge at the base of the shirt.
18. Front length: It is the vertical length of the front measured from the band bottom to the end of bottom.
19. Back length: It is the vertical length which is measure from the middle point of the collar seam to the end of the shirt bottom.
20. Shoulder: Measure at the back of the shirt, when it is laid uniformly upside down. It is the length of the top yoke.
21. Across back: Shirt is spread upside down and takes measurement from the shortest distance between armholes.
22. Yoke length: It is the gap between the sleeves, take measure from one edge of the shoulder to the other edge on the back side of the shirt.
23. Side seam: This is the gap between bottom of armhole and bottom at the side of the shirt.
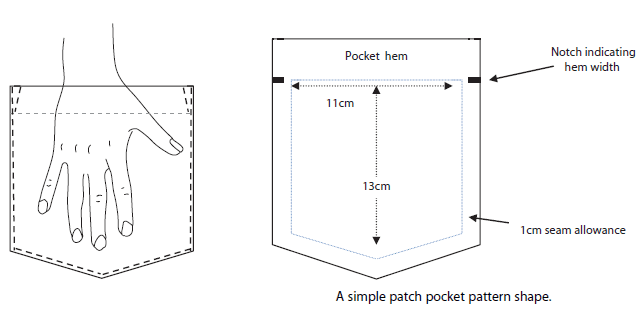
24. Pocket: Pocket position mainly depends on the size of the shirt and placed on left side. It is measure vertical length from the shoulder point and also places the measurement tape horizontally from the armhole line. Position of the pockets & styles are depending on the customer desire.
Once you have these measurements, you can compare them to the size chart provided by the shirt manufacturer. Keep in mind that different brands may have slightly different sizing, so it’s always a good idea to double-check the size chart before making a purchase.
Special Note for Taking Measurement:
Commonly garment allowances may be based on the fabric weave, quality of fabric, measurement profile, and style of shirt design. For the actual garment manufacturing allowances or tolerance follow on international standards. All the following allowances normally apply on the shirts, suits, jackets, pants for men and women. These are in below:
- Chest size: (+/-) 2.0cm Total circumference
- Collar: (+/-) 0.5 cm total circumference
- Hip size: (+/-) 2.0 cm Total circumference
- Shoulder length/Yoke: (+/-) 0.6 cm Total length
- Sleeve length: (+/-) 1.0 cm Total length
- Waist size: (+/-) 2.0 cm Total circumference
Conclusion:
Men’s dress shirt measurements include neck, chest, waist, sleeve length, shoulder width, shirt length, and sleeve width. Accurate measurements ensure a comfortable and well-fitting shirt. Tailoring or referring to brand-specific size charts is advised for the best fit. It’s important to note that different brands may have slight variations in their sizing, so it’s always a good idea to refer to their specific measurement charts for the most accurate fit.
You may also like:
- Step by Step Analysis of a Basic Shirt
- Step by Step T-Shirt Measurement Techniques with Size Chart
- Step by Step Polo Shirt Measurement Guide with Size Chart
- Step by Step T-Shirt Manufacturing Process with Machine Layout Plan

Editor of Fashion2Apparel. She is a fashion designer and ex-lecturer in Fashion Designing. She wants to spread fashion knowledge throughout the world.